vegetable roti, also known as “elawalu roti” in Sinhalese is a popular Sri Lankan snack found in restaurants, roadside shops and bakeries.
In this recipe, I give you step-by-step instructions and guide you on how to make your own vegetable roti(elawalu roti) at home.
I have added as many details and tips for beginners to give you the best chance of getting the recipe right the first time.
Not only will you learn how to make the vegetable roti the correct way, once you make them you’ll respect all the street vendors who actually make them for a living because this stuffed roti has a few complicated components to it.

You can easily identify the fillings of these stuffed Rotis by the shape they are made into.
The triangle-shaped ones will usually be with a vegetarian filling while other shapes will have meat in them usually fish or beef.
They are so filling and tasty and you can have this vegetable roti for breakfast, lunch or on a road trip around the country.

If you’ve never had a vegetable roti then make sure to add them to your bucket list of must-eat while travelling around the island.
And the best way to eat it?
When they are still slightly hot and with a good strong Sri Lankan tea.
Save the recipe to PINTEREST

Tips on making vegetable roti.
- Before you think of making the vegetable roti, be aware that you need to preplan at least 8-9 hours ahead or overnight.
- To make it one step easier, you always have the option of making the vegetarian filling a day ahead and refrigerate. This is what I did.
- Since it’s a time-consuming process, I made the filling mid-day, the dough at night(a couple of hours before heading to bed) and made the vegetable roti in the morning.
- Make sure to taste and slightly reheat the vegetable filling 30 minutes before you have to use it.
- Making the dough.
- Making the “elavalu roti” starts with the dough.
- Once you make the dough, the most crucial element of giving the dough its elasticity is submerging it in oil for hours.
- While 7-8 hours works well, I would suggest doing an overnight soak. Start making the dough 1 hour before your bedtime then make the dough balls and submerge them in oil.
- The dough balls need to be completely submerged in oil to get the correct consistency and for the dough to stretch out as you smooth it out with your hands.
- When rolling out the dough.
- You need a clutter-free and clean countertop or a smooth surface to roll out the dough.
- Once the dough balls are stretched out, avoid rolling them back into balls to reshape them, you won’t be able to get the same smooth dough balls.
- In fact, you won’t be able to do anything with them that resembles a vegetable roti so make sure to smooth out the dough with care.
- Any holes that appear can be pinched together or covered as you roll out the dough with the filling, so don’t worry about having the most perfectly smoothed-out dough.
- The dough, when rolled out, should be thin, as thin as you can go without sudden holes appearing.
Making vegetable roti in different shapes.
- While making vegetable roti into a long, rectangular shape is easier rather than, shaping them into a triangle.
- In order to shape the vegetable roti into a triangle, you need to use the folding method used in rolling samosas.
- I would suggest using the how-to fold samosa video in the recipe instruction given below to practice on a strip of paper a few times before trying it out on the real dough.
- Make sure not to add too much filling, this would make folding the roti slightly difficult.
- The dough is elastic enough that even with the filling you can shape the roti that looks misshapen into a triangle as you go, that’s the beauty of this vegetable roti dough.
- Use a large flat frying pan to cook multiple vegetable roti at the same time.
- Maintain low-medium heat at all times and cook all sides until the outer dough layer is almost dark or you will definitely have raw dough spots.
Utensils and appliances needed.
- Chopping board and knife.
- A pan to cook the vegetable filling.
- A large deep bowl to mix the dough.
- Deep bowl to submerge the dough in oil.
- A flat surface to roll out the dough thin for vegetable roti.
- A flat-bottomed frying pan or tawa to cook multiple veggie rotti at the same time.
- Platter with kitchen paper towels to place the cooked vegetable roti.

Workflow to make the vegetable roti.
- Read the beginner’s tips and recipe carefully to avoid mistakes.
- Have all the ingredients and appliances ready.
- Make the vegetable filling.
- Make the dough and soak it in oil several hours before or overnight(recommended).
- Make the vegetable roti into the shapes you prefer.
- Cook all sides.
More Sri Lankan snacks to try.
Sri Lankan maalu paan(fish buns).
parippu vadai(lentil fritters).
Sri Lankan chicken kottu roti.
RECIPE DIFFICULTY- EXTRA CARE IS NEEDED
Ingredients to make vegetable roti(elawalu roti)
The ingredients mentioned below use standard measuring cups and spoons.
For the dough
5 cups of flour
1 and 1/2 cup of water(used as needed to get the correct dough consistency)
Salt to season
4 cups of oil to submerge the dough
For the vegetable filling
3- 4 tablespoons of oil
A sprig of curry leaves chopped fine
1-inch pandan leaf
2 large onions chopped fine
5 garlic minced fine
2 medium-sized green chillies chopped fine
3 medium-sized carrots grated
1 tablespoon of fresh black pepper(1 more additional teaspoon if needed)
1 teaspoon of turmeric powder
1 teaspoon of curry powder
1 teaspoon of red chillie powder
1 teaspoon black pepper powder
3 large stalks of Leeks chopped fine
4 medium-sized potatoes boiled
Salt to season
making Sri Lankan vegetable roti at home.
How to make the vegetable filling.
Boil the potatoes until very soft, remove the skin and set aside to cool.
Grate the carrots and leeks.
Have all other ingredients ready to prepare the vegetable filling.
Place a pan over medium fire and add 2-3 tablespoons of oil.
You will want to add the least amount of oil possible so you get a dry filling.
Add chopped curry leaves, pandan, garlic(4 cloves), onions(2 large), and green chillies(2 medium).
Cook until the onions turn soft.
Add the grated carrots(3 medium) followed by turmeric(1 tsp), red chilli powder(1 tsp), curry powder(1 tsp), black pepper powder(1 tsp), and season with salt.
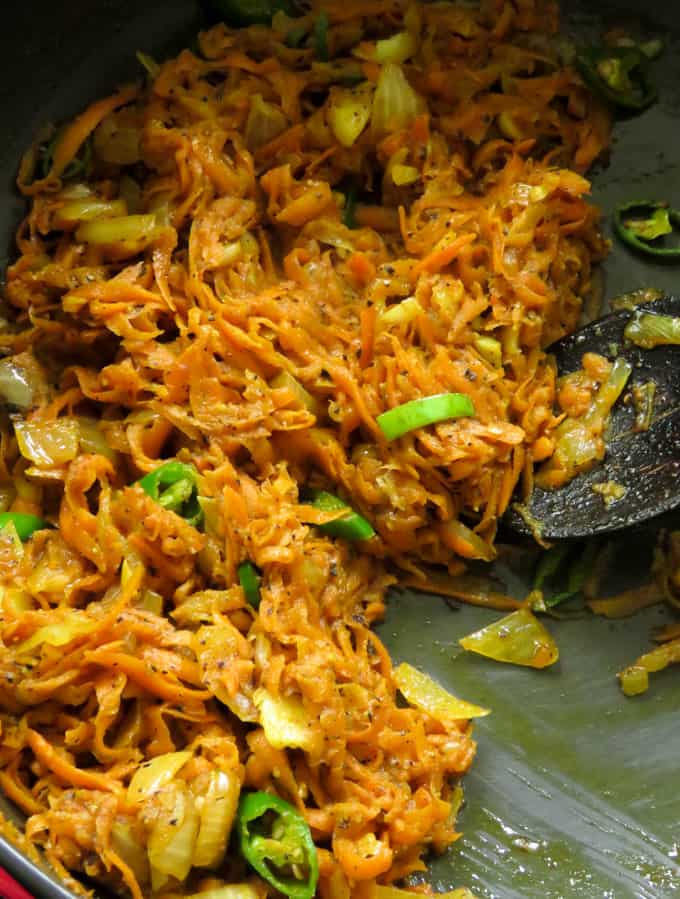
Cook until the carrots turn soft.
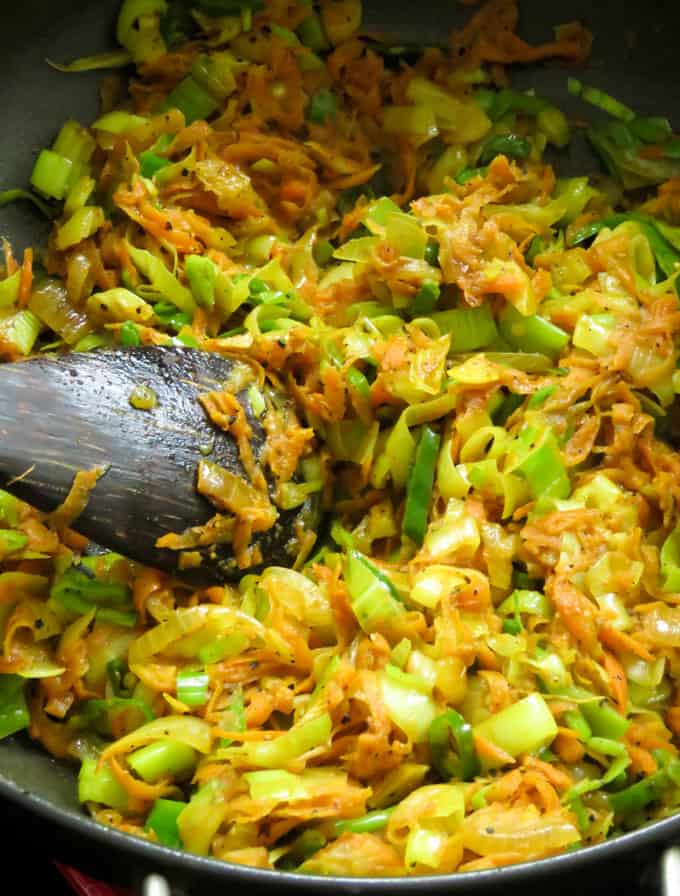
Add the leeks, combine with all ingredients in the pan and cook for 3-5 minutes.
Taste and season as needed by adding pepper and salt.
Once you’ve cooked down the leeks(they should still retain the green and not be pale when they are overcooked)remove the pan from the fire.
Add the potatoes(4 medium)and roughly mash and combine them with the other vegetable ingredients in the pan.
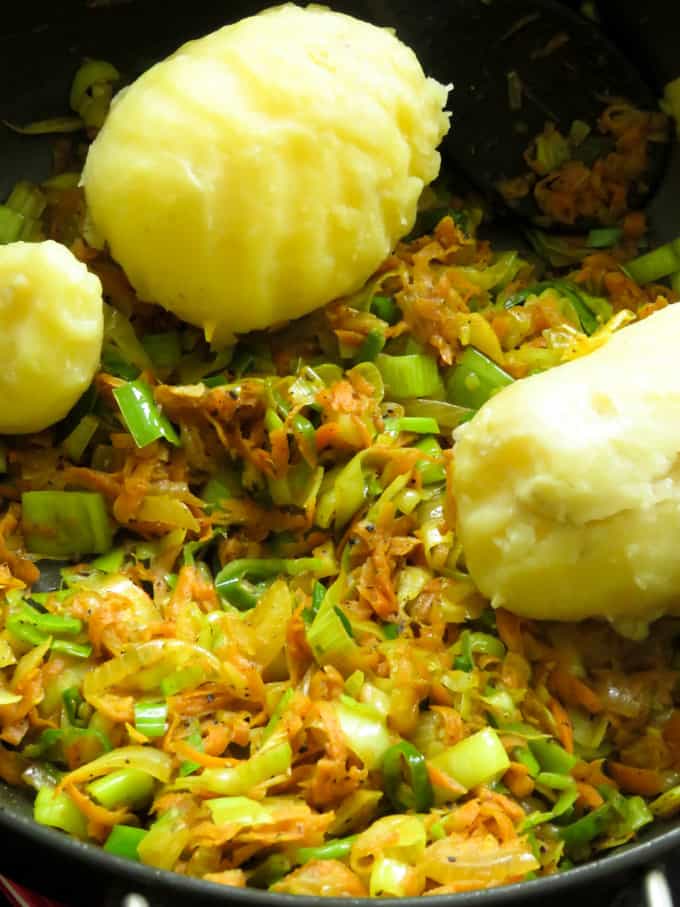
Taste and season with salt if necessary.
The potatoes should be broken down with a spoon so that there are smaller pieces to bite into.

Set aside to cool.
the dough for the vegetable roti.
In a large bowl mix, flour, and salt.
Pour in water gradually while combining ingredients to make a stiff dough that does not stick to the pan.

Knead the dough in a push-and-pull motion to make the dough pliant for 10 minutes.
The result should be a smooth and soft dough.
Once the dough is done, portion out the dough a little larger than a golf ball.
Make sure these dough balls are extremely smooth by using both palms to roll out perfect balls.
Spend a few minutes doing these. and set them aside on a plate.
Pour oil into a deep container or pan(a deep baking dish or a Pyrex dish)that will help to submerge the balls in oil completely.
As you place the dough balls in the oil they should not stick to each other.
It is vital that the balls are completely submerged or the exposed dough will have a grainy consistency as you roll out the dough.
You can even flatten these dough balls slightly and submerge them if you find the oil is not adequate.
rolling out the dough for vegetable roti
(elawalu roti).
- Once the dough balls have been soaking in the oil for hours or overnight.
- Take the oily softball onto a smooth surface or countertop.
- Slightly press with your fingers to flatten and then stretch the dough in opposite directions.

- Keep stretching the dough on the opposite side.
- Use your fingertips to first do the initial stretching and then use a smoothing-out motion to gradually lengthen and widen the dough.
- the oil in the dough will help you make this process easy if not add a little oil to your palm.

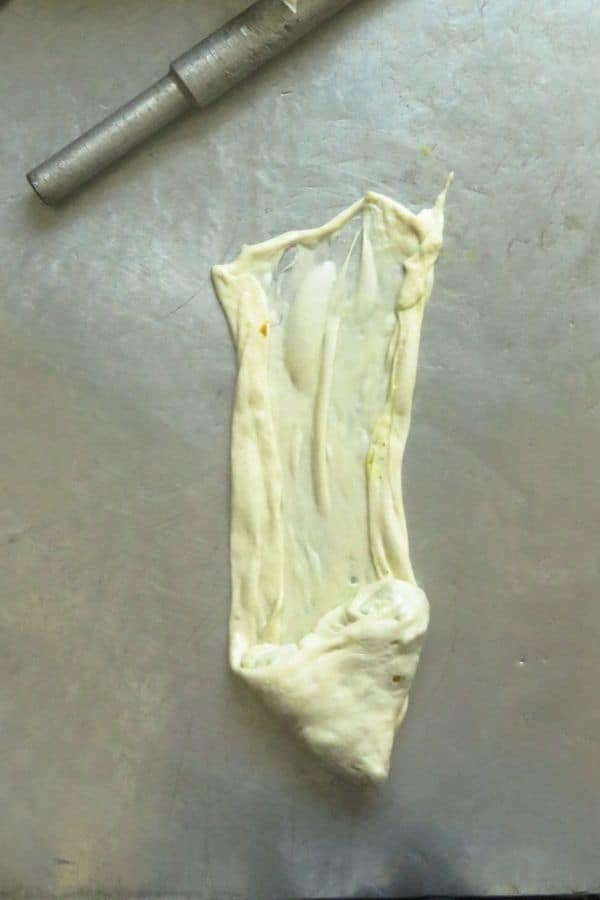
- Once you have the rough shape of the rolled-out dough, it will still be slightly thick as below.

- Use your fingers and hold onto the seams of the dough.
- lift it a few inches from the surface and stretch further upwards.
- Do the same on the bottom of the dough as well.
- Don’t worry about the air pockets you create as they will settle once the dough is stretched completely.

- Continue to stretch the sides, and lift the dough using your fingers to stretch the left and right sides of the dough.
- The shape need not be perfect but should have a rough elongated(long) shape so you can wrap the filling into two to three layers of dough.

Rolling out the vegetable roti.
Once you’ve rolled out the dough, 2 tablespoons of the filling to the bottom of the rolled-out dough.

Cover the filling as shown below.

Fold the right side of the dough strip inwards.

Fold the left side of the dough strip inwards.
As you will notice the first rollout over the filling is not so perfect but messy.
Don’t worry about it, this dough is soft and pliant that you can shape it as you roll it out.

As you continue rolling, smooth out and shape the vegetable roti to take on the long rectangle shape.

You will notice the two main sides are flat. continue rolling the dough.

For the final rolled-out vegetable roti, place it on a well-oiled plate.

making the Triangle-shaped vegetable roti.
Read the beginner’s tip for more details.
practice how you will fold a samosa on a strip of paper as this is the folding method we will be using for this vegetable roti.
The first few steps of rolling the dough follow the same as above, up until you add the filling.
For you to visualize the triangle shape, add the filling in the shape of a triangle.
Not exactly in the middle but slightly to the left or right whichever side you are comfortable with.
I would suggest watching this video on how to fold a samosa strip before attempting the fold.
I’ll add a more detailed process of folding to a triangle shape when time permits.

Fold the right side inwards to cover the filling.

fold the left side to cover the filling. although not shown here, I took out all the extra filling to make the folding easy.

Bring in the bottom part of the dough to cover the filling.
Once you use the bottom part of the dough, you should have a roughly 90-degree angle triangle showing. move the pointed section upwards.
Yes, continue using the samosa folding method to get the triangle shape.
You will have to forgive me for not giving you a clearer image as I didn’t want to touch my camera with oily hands.

As you fold, use both hands to shape the vegetable roti.
One to shape the sides and the other to slightly flatten on top.

Continue to shape as you fold.

The final product should look like the above.
making the vegetable roti over a stovetop.
Having a large tawa like below makes frying a number of vegetable roti at the same time easy.
You will not need any oil to fry them as the dough already has the oil needed.
Over low-medium fire(maintain heat throughout)place the Tawa and add two to three vegetable roti on it.

You will need to cook each side of the roti for at least 5-7 minutes.
Remember there are layers of roti to cook through, sometimes this can take longer but all sides of the roti must cook through.

Use a tong to continuously flip the roti every 2-3 minutes or hold for a while to get an even frying time.

For the triangles, cook the two main sides first.

And then fry the sides, make sure to hold the pointy edges over the hot Tawa to avoid raw dough as they are thicker than any other part of the vegetable roti.

Here’s what I do.
Frying each roti this way can be time-consuming, so I added 5 of them.
Fry the main two sides till firm and then let them lean on each other so that I don’t need to balance the longer ones.
I place them around the Tawa so that I can flip the sides in rotation, giving each roti equal time to fry over the heat.

Serve warm.
If you are an absolute beginner to this, I will strongly recommend you do the longer rectangle-shaped vegetable roti first and then for the second time make the triangle vegetable roti.
Don’t try to do it at the same time.

JOIN ME ON ISLANDSMILE YOUTUBE CHANNEL
visit the SEAFOOD BLOG.

vegetable roti(Sri Lankan street eats, snacks).
This is your step-by-step recipe guide on how to make your own vegetable roti at home.
Ingredients
- Ingredients mentioned below use standard measuring cups and spoons.
- 5 cups of flour
- 1 and 1/2 cup of water(used as needed to get the correct dough consistency)
- Salt to season
- 4 cups of oil to submerge the dough
- For the vegetable filling
- 3- 4 tablespoons of oil
- A sprig of curry leaves chopped fine
- 1-inch pandan leaf
- 2 large onions chopped fine
- 5 garlic minced fine
- 2 medium-sized green chillies chopped fine
- 3 medium-sized carrots grated
- 1 tablespoon of fresh black pepper(1 more additional teaspoon if needed)
- 1 teaspoon of turmeric powder
- 1 teaspoon of curry powder
- 1 teaspoon of red chillie powder
- 1 teaspoon black pepper powder
- 3 large stalks of Leeks chopped fine
- 4 medium-sized potatoes boiled
- Salt to season
Instructions
- HOW TO MAKE THE VEGETABLE FILLING FOR THE STUFFED ROTI.
- Boil the potatoes until very soft, remove skin and set aside to cool.
- Grate the carrots and leeks.
- Have all other ingredients ready to prepare the vegetable filling.
- Place a pan over medium fire and add 2-3 tablespoons of oil.
- You will want to add the least amount of oil possible so you get a dry filling.
- Add chopped curry leaves, pandan, garlic(4 cloves), onions(2 large), green chillies(2 medium)cook until the onions turn soft.
- Add the grated carrots(3 medium) followed by turmeric(1 tsp), red chilli powder(1 tsp), curry powder(1 tsp), black pepper powder(1 tsp), and season with salt.
- Taste and cook until the carrots turn soft, add the leeks, combine with all ingredients in the pan and cook for 3-5 minutes.
- Once you’ve cooked down the leeks(they should still retain the green and not turn pale when overcooked)remove the pan from the fire.
- Add the potatoes(4 medium)and roughly mash and combine them with the other vegetable ingredients in the pan.
- Taste and season with salt if necessary, the potatoes should be broken down with a spoon so that there are smaller pieces of them to bite into.
- Set aside to cool.
HOW TO MAKE THE DOUGH FOR THE ROTI.
- In a large bowl mix, flour, and salt.
- Pour in water gradually while combining ingredients to make a stiff dough that does not stick to the pan.
- Knead the dough in a push and pull motion to make the dough pliant for 10 minutes. the result should be a smooth and soft dough.
- Once the dough is done, portion out the dough a little larger than a golf ball.
- Make sure these dough balls are extremely smooth by using both palms to roll out perfect balls. spend a few minutes doing these.
- Set them aside on a plate.
- Pour oil into a deep container or pan(deep baking dish or a pyrex dish)that will help to submerge the balls in oil completely.
- As you place the dough balls in the oil they should not stick to each other.
- It is vital that the balls are completely submerged or the exposed dough will have a grainy consistency as you roll out the dough.
- You can even flatten these dough balls slightly and submerge them if you find the oil is not adequate.
HOW TO ROLL OUT THE DOUGH FOR THE VEGETABLE ROTI.
- Once the dough balls have been soaking in the oil for hours or overnight.
- Take the oily softball onto a smooth surface or countertop.
- Slightly press with your fingers to flatten and then to shape the dough in opposite directions.
- Keep stretching the dough on the opposite side, use your fingertips to first do the initial stretching and then use smoothing out motion to gradually lengthen and widen the dough.
- The oil in the dough will help you make this process easy if not add a little oil to your palm.
- Once you have the rough shape of the rolled-out dough, it will still be slightly thick as below.
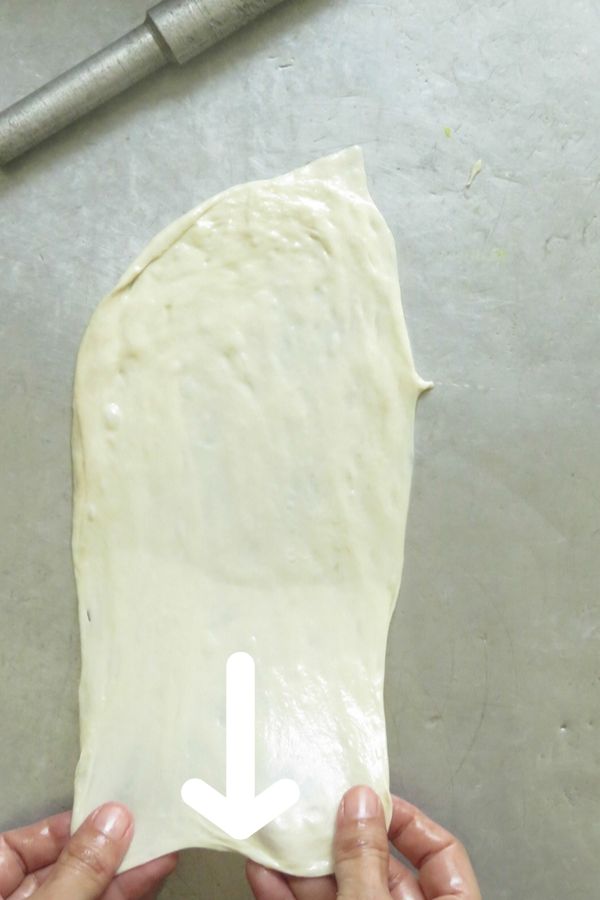
- Using your fingers and holding onto the seams of the dough, lift it a few inches from the surface and stretch further upwards, do the same to the bottom of the dough as well.
- Don’t worry about the air pockets you create as they will settle once the dough is stretched completely
- Continue to stretch the sides, and lift the dough using your fingers to stretch the left and the right sides of the dough.
- The shape need not be perfect but should have a rough elongated(long) shape so you can wrap the filling into two to three layers of dough.
ROLLING OUT THE VEGETABLE ROTI.
- Once you’ve rolled out the dough, add 2 tablespoons of the filling to the bottom of the rolled-out dough
- Cover the filling as shown below.
- Fold the right side of the dough strip inwards.
- Fold the left side of the dough strip inwards. As you will notice the first rollout over the filling is not so perfect but messy.
- Don’t worry about it, this dough is soft and pliant that you can shape it as you roll it out.
- As you continue rolling, smooth out and shape the vegetable roti to take on the long rectangle shape.
- You will notice the two main sides are flat. continue rolling the dough.
- For the final rolled-out vegetable roti, place on a well-oiled plate.
HOW TO MAKE THE TRIANGLE-SHAPED VEGETABLE ROTI.
- Read the beginner’s tip for more details.
- Practice how you will fold a samosa on a strip of paper as this is the folding method we will be using for this vegetable roti.
- The first few steps of rolling the dough follow the same as above, up until you add the filling.
- For you to visualize the triangle shape, add the filling in the shape of a triangle.
- Not exactly in the middle but slightly to the left or right whichever side you are comfortable with.
- I would suggest watching this video on how to fold a samosa strip before attempting the fold.
- I’ll add a more detailed process of folding to a triangle shape when time permits.
- Fold the right side inwards to cover the filling.
- fold the left side to cover the filling. although not shown here, I took out all the extra filling to make the folding easy.
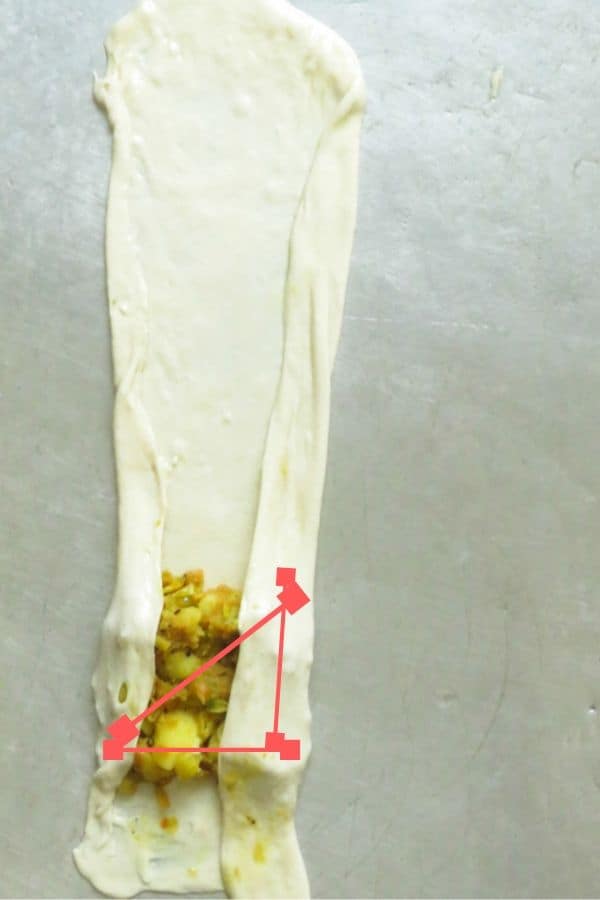
- Bring in the bottom part of the dough to cover the filling.
- Once you use the bottom part of the dough, you should have a 90-degree angle triangle showing. move the arrowed the pointed section upwards.
- Continue using the samosa folding method to get the triangle shape, you will have to forgive me for not giving you a clearer image as I didn’t want to touch my camera with oily hands.
- As you fold, use both hands to shape the vegetable roti, one to shape the sides and the other to slightly flatten on top.
- The final vegetable roti should look like above.
HOW TO FRY THE VEGETABLE ROTI.
- Having a large tawa like below makes frying a number of vegetable roti at the same time easy.
- You will not need any oil to fry them as the dough already has the oil needed.
- Over low-medium fire(maintain heat throughout)place tawa and add two to three vegetable rotis on it.
- You will need to cook each side of the roti at least 5-7 minutes(remember there are layers of roti to cook through)sometimes this can take longer but it’s important that all sides of the roti cook through.
- Use a tong to continuously flip the roti every 2-3 minutes or holding for a while to get an even frying time.
- For the triangles, cook the two main sides first.
- And then fry the sides, make sure to hold the pointy edges over the hot tawa to avoid raw dough as they are thicker than any other part of the vegetable roti.
Here’s what I do.
- Frying each roti this way can be time-consuming, so I add 5 of them, fry the main two sides till firm and then let them lean on each other so that I don’t need to balance the longer ones.
- I place them around the Tawa so that I can flip the sides in rotation, giving each roti equal time to fry over the heat.
- Serve warm.
- If you are an absolute beginner to this, I will strongly recommend you do the longer rectangle-shaped vegetable roti first and then for the second time make the triangle vegetable roti.
- Don’t try to do it together.
Recommended Products
As an Amazon Associate and member of other affiliate programs, I earn from qualifying purchases.
-
 Instant Pot Duo 7-in-1 Electric Pressure Cooker, Slow Cooker, Rice Cooker, Steamer, Sauté, Yogurt Maker, Warmer & Sterilizer, Includes Free App with over 1900 Recipes, Stainless Steel, 3 Quart
 -
 Prestige PRP4 Pressure Cooker, 4 L, Silver
 -
 Dough Blender/Masher/Kneader and Bench Scraper,Stainless Steel Pastry Cutter - Multipurpose Kitchen Chopper Tools for Baking Bread Butter and Pizza,Set of 2 Pack
 -
 Fullstar 9-in-1 Deluxe Vegetable Chopper Kitchen Gifts | Onion Chopper & Dicer | Peeler, Spiralizer, Zoodle Maker, Lemon Squeezer, Egg Slicer & Seperator- Ultimate Kitchen Gadget
 -
 ESLITE LIFE Deep Frying Pan with Lid Nonstick Saute Pan with Granite Coating, 11 Inch (5 Quart)
 -
 Kitchen Shears, iBayam Kitchen Scissors Heavy Duty Meat Scissors Poultry Shears, Dishwasher Safe Food Cooking Scissors All Purpose Stainless Steel Utility Scissors, 2-Pack (Black Red, Black Gray)
 -
 Mueller HyperGrind Precision Electric Spice/Coffee Grinder Mill with Large Grinding Capacity and HD Motor also for Spices, Herbs, Nuts, Grains, White
 -
 Spice Container - Masala Dabba - 7 Compartments, masala box,steel masala dabba,Spice container box,stainless steel spice box indian masala dabba with 7 spice containers with size 8 X 8 inches (1)
 -
 AmazonCommercial Mixing Bowls, 7 Piece Set, Lids Not Included
 -
 Chef Knife PAUDIN N1 8 inch Kitchen Knife, German High Carbon Stainless Steel Sharp Knife, Professional Meat Knife with Ergonomic Handle and Gift Box for Family & Restaurant
 -
 WObell Meat Thermometer for Kitchen Cooking Digital Instant Read Food Thermometer for Candy Oil Deep Frying Baking Outdoor Cooking Grilling BBQ Smoker Thermometer with Backlight and Magnet
Nutrition Information:
Yield: 10 Serving Size: 1Amount Per Serving: Calories: 1267Total Fat: 102gSaturated Fat: 9gTrans Fat: 1gUnsaturated Fat: 88gCholesterol: 0mgSodium: 232mgCarbohydrates: 81gFiber: 5gSugar: 3gProtein: 10g
Nutritional information on islandsmile is provided as a courtesy. We cannot guarantee the accuracy of the nutritional information given for any recipe on the site. these figures should only be considered as estimates.
Each recipe on this blog has been written with great care and love to the best of my ability with you in mind.
It’s free and on the blog, for you to try anytime.
All I ask is that you do not save it on any apps, recipe boxes or online groups which will affect me as a food blogger and the growth of this blog.
I would appreciate it if you only share the link rather than the full recipe.
All images and text on this website are protected by copyright.
Meg
Tuesday 21st of July 2026
Hi, i need to make about 100 of these tomo,.is it possible to bake in large batches in an oven? Just trying to come up with a faster way! Thanks
jehan
Friday 24th of July 2026
Hi Meg, I apologise for the late reply, i havent baked these before. did you try it by any chance? regards J
J.B
Friday 20th of February 2026
I made these with pre-made frozen roti and they were great. Very good flavours.
jehan
Saturday 7th of March 2026
Thank you for trying the recipe. Regards Jehan
Shifna
Sunday 3rd of April 2022
Hi,the recipe is well explained.congrats for your blog
jehan
Saturday 9th of April 2022
Hi Shifna, thank you for trying out the recipe, glad the recipe came out well. sorry for the late reply as moving house. Regards J
Ratna krishnakumar
Sunday 26th of December 2021
Hi. Is this the same dough that is used for kheema( mince) filled rotis? I had it years ago and remember the taste! It was called Ceylon porotta. Do you have the recipe for that? Would love to make it and eat it!
jehan
Monday 27th of December 2021
Hi Ratna, yes you can use the same roti dough to make the kheema roti as well. no I haven't posted a recipe but will add to my list of recipes to post on the blog for the coming year. Seasons greeting and have a blessed 2022. regards J